
No matter what kind of data you are backing up, Intuit Data Protect guarantees 45 days of version history for your data and always provides bank-level protection. Error warnings such as these may appear during the process, and you may discover that your Intuit Data Protect isn’t functioning because of an old version or improper Windows firewall settings.
- Firewall or Connection Issue: Intuit data Protect Backup Failed
- Error #229 : Intuit data Protect Backup Failed
Please don’t panic; we’re here to help you resolve the problem and make sure the company file backup works. To resolve problems with Intuit Data Protect, read this comprehensive tutorial and follow each step individually.
Reason for Intuit Data Protect Backup Failing
You may discover that your Intuit Data Protect is not functioning for a number of reasons. Let’s examine them in greater depth.
- You may not have an NFTS file system.
- Utilizing an antiquated version of Intuit Data Protect or QuickBooks.
- Windows firewall configuration gone awry.
- IBuEngHost.exe, an IDP file, may be operating as a Windows administrator.
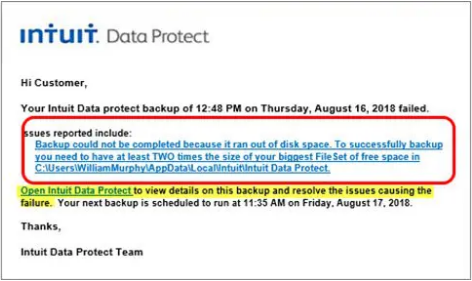
- Intuit Data Protect does not have enough space.
- Excessive temporary file, cookie, and cache storage.
- Perhaps you shouldn’t trust Intuit Data Protect.
- Lacking the necessary admin rights for IDP.
- The QuickBooks Desktop file may be accessible through the network disc.
Intuit Data Protect Backup Does Not Run: Troubleshooting
To make sure you can use IDP to back up your data, follow the troubleshooting steps in this article. Please get in touch with us if you have any questions.
1. To confirm that the file system on the local device is NTFS, check it
Only NTFS file systems are supported by Intuit Data Protect backups. IDP won’t back up your corporate file if it’s anything else.
Take a look at the file system by doing the following:
- Get My Computer Opened.
- Select Properties by doing a right-click on the C disc.
- Make sure that NTFS is the listed file system now.
Important Note: Close the QuickBooks company file (.QBW) on the same computer as Intuit Data Protect for the backup to be successful. A mapped disc should be used for backups if the file is located on a network resource rather than the UNC path (\).
Proceed to the next troubleshooting step if the IDP backup you are using continues to fail.
2. Verify that Intuit Data Protect and QuickBooks Desktop are up to date
Using an out-of-date QuickBooks program or Intuit Data Protect to back up the company file can lead to IDP backup failure. Update QuickBooks Desktop and Intuit Data Protect to the most recent versions to prevent disruptions.
Upgrade Intuit Data Protect
First, let’s use the instructions below to obtain the most recent version of Intuit Data Protect.
- Select Help from the menu bar at the top.
- From the selection menu, select Update QuickBooks.
- On the Update Now tab, click.
- Verify that the list has Data Protect selected.
- Click Get Updates after that.
Use these instructions to install the downloaded IDP update:
- On the toolbar of your desktop, click the up arrow symbol. It is located next to the clock in the lower-right corner.
- To access Intuit Data Protect, right-click on the symbol and choose About Intuit Data Protect. It will resemble a green padlock
- Select Update now.
- After finishing, select OK.
If updating IDP isn’t working for you, try downloading the most recent version via the OCD folder. Here’s how
- Take note of the version you are using when you open the About Intuit Data Protect window.
- To access Task Manager, use the Ctrl, Alt, and Del keys.
- Proceed to terminate the subsequent executable tasks via the Task Manager:
- Data Protector Intuit.exe
- The IBuengHost.exe file
- The QBIDPService.exe file
- Go to C:\ProgramData\Intuit\QuickBooks XX.0\Components\DataProtect\OCD after finishing. Here, the QuickBooks Desktop version that you are using is XX.0.
- Locate and perform a right-click on the IntuitDataProtect.exe file. Select Properties after that.
- Now compare the versions found in the windows for Properties and About IDP.
- Step 2 should be followed if IDP is in a more recent version. If not, you may make QuickBooks download the most recent IDP version by reinstalling the Program. Next, carry out the following action.
- Extract all of the contents from the OCD folder.
- After that, copy them into the IDP folder [C:\Program Files\Common Files\Intuit\DataProtect].
- Transfer Bueng32.dll to the Sym64 folder by copying it from the same folder.
- When finished, launch Services.msc by going to Windows Start > Services > and make sure QBIDPService.exe is running. If not, launch an identical service.
- Intuit Data Protect should now be launched. Check the About IDP page to see if it has been updated.
3. Utilize the Data Protect Diagnostic tool from Intuit
The purpose of the Intuit Data Protect Diagnostic tool is to fix IDP problems and guarantee the seamless operation of your business’s file backup. The utility runs a thorough disc space check on your computer and checks for important Windows components including the Intuit Data Protect version and the.NET Framework.
- Select the ~up arrow icon from the desktop Toolbar.
- Select Intuit Data Protect after performing a right-click on the Intuit Data Protect icon.
- To launch the Intuit Data Protect Diagnostic tool, concurrently hit the Ctrl and F2 keys.
- Click on Run Diagnostics now.
- If any issues are found, the tool will show an error popup.
- To find out how to resolve a particular IDP issue, refer to the comprehensive chart provided below.
Select Create Zip File and get in touch with us for assistance if you are unable to resolve the problem.
Intuit Data Protect Diagnostic tools results:
| Issue | Fix |
|---|---|
| Free Physical Memory | Specifics: 150MB of free physical memory is required at minimum for the IDP tool. Your system does not have enough memory available to run IDP, as shown by an error message that appears after running. Correct it: You should either buy and install more memory or free up some space on your computer to resolve the problem. |
| Free Local Disk Space | Details: Only when there is empty space in C:\Documents and Settings\Administrator\Local Settings\Application Data\Intuit\Intuit Data Protect that is at least twice the size of your largest File Set plus an extra 60MB will Intuit Data Protect correctly backup your files. You will receive this error if your machine is not running on enough memory. You need to have 2G and 60MB of free space on your computer, for instance, if the file or file set you are backing up is 1G in size. Correct it: Either make enough space on your drive or transfer the file or file set you are backing up to a drive with a larger capacity to fix the problem. |
| .Net | Details: IDP requires at least version 3.5 of the.NET Framework in order to back up your corporate file. Go to the following solution if you are experiencing .net-related issues. Correct it: You must ensure that you are using at least version 3.5 of the.NET Framework in to fix this. See Fix or reinstall the Microsoft.NET Framework for more .nET-related problems. |
| QBIDPService | Information: IDP needs this service in order to back up your company file. Correct it: Check QBIDPService to resolve the issue: Enter “services.msc” into the search bar after selecting the Windows Start menu. The Services window will open. Select QBIDPservice now to make it visible. Choose Restart from the menu on the left side of the window. Run the IDP Diagnostic Tool one last time to be sure the problem has been resolved. |
| IDP Version | Details: To back up the company file, you must use the most recent version of IDP. Correct it: Make sure you are using the most recent IDP version in order to fix this issue. |
| Backup System | Details: This error suggests that there is a problem with either your connection to the IDP servers or the servers themselves. Resolve it: If you have been using IDP without any problems lately, give it a rest and then give it another go. Check your computer’s security and antivirus software to make sure they aren’t obstructing Intuit Data Protect services and processes if you haven’t been able to successfully back up company files using IDP. |
| Authentication System | Details: This error suggests that there may be a problem with the authentication servers or your connection to them. Correct it: If you have been using IDP without any problems lately, give it some time before attempting again. Check your computer’s security and antivirus software to make sure they aren’t obstructing Intuit Data Protect services and processes if you haven’t been able to successfully back up company files using IDP. |
| Authentication and Entitlement | Contact us for assistance with troubleshooting if you encounter such a problem. |
| Test Sample Backup | Details: A small test file is backed up by the system to make sure the backup is operating as intended. It won’t affect your backup quota to use this test file. Resolve it: Please contact us for assistance in debugging any errors you may find. |
| Analyze Logs | Details: The system looks through your log files to see what errors there may be. Correct it: Please contact us for assistance in troubleshooting any errors you may find. |
Proceed to the following solution if IDP refuses to back up your corporate file.
4. Check to see if Intuit Data Protect is being blocked by the Windows firewall
If the Windows firewall is preventing you from accessing Intuit Data Protect, you may have problems. Check and modify your firewall settings to give Intuit Data Protect continuous access to guarantee flawless performance
To the Windows firewall, add IDP files,
- To access the Start menu in Windows, use the Windows key.
- Enter a firewall into the search field and look for it.
- To open Window Firewall, select it from the search results.
- Click Allow an application across Windows Firewall now, then choose Allow another application.
- Select Explore and look for Program Files(x86)\Common Files\Intuit\Data Protect.
- Locate the QBIDPservice.exe file, and then click on it.
- Toggle the Private checkbox by clicking on Network types. Next, select Add.
- For the files IntuitDataProtect.exe and IBUenghost.exe, repeat steps 4 and 5.
If, during the file addition process, you receive a notification stating that the files already exist, you’re set
Note: The IDP may also be prevented from operating by third-party Programs or antivirus software. Thus, make sure that in these security apps, these files are added as exceptions. Visit the software's official website if you need help with this.
Check to see if the Intuit Data Protect backup problem has been resolved by trying to back up your company file once more. If not, move on to the following fix.
5. Ensure that the Windows user is not using IBuEngHost.exe
In order to prevent problems, the IbuEngHost.exe program needs to be run as a system user rather than as Windows while using Intuit Data Protect.
Make that the file is operating as a System user by checking,
- To access Task Manager, right-click on the Taskbar located at the bottom of your computer’s screen and select it.
- Check for IBuEngHost.exe by going to the Details page.
- Verify its username, which should be System, and note that it is currently running.
In case IBuEngHost.exe isn’t operating as a System user, proceed with the following procedures,
- For the QuickBooks version, you have to download a fresh installer. Put the file somewhere you can find it easily.
- Navigate to the directory where the installer file was saved.
- Select “Run as Administrator” with a right-click on the identical file.
- You might now want to think about reinstalling QuickBooks Desktop.
- Reopen Task Manager after that, and search for the IBuEngHost.exe file once more.
- Ascertain thatthe System is the username and that the status is running.
- Try again, and if your IDP files still don’t backup, continue using the methods listed below.
6. Make space in Intuit Data Protection
Learn how to release backup space if Intuit Data Protect has hit its storage limit by following the instructions below.
Make sure IDP is up to current on your system
Make sure Intuit Data Protect is up to date before making any space-related changes. Download the most recent version by following the instructions in Solution 1.
Eliminate the backup folders
It’s important to remember that you cannot get the backup files back after you remove them. So, in case you need them, download the backup files first. Nothing will change or be impacted by Intuit Data Protect.
- On your desktop, find the Intuit Data Protect symbol in the lower right corner and right-click on it.
- Choose Open Intuit Data Protect after that.
7. Diminish the size of the backup file
To lessen the likelihood that Intuit Data Protect may exceed its allotted storage, delete the files you don’t need to back up.
- Select Open Intuit Data Protect by performing a right-click on the IDP icon located at the bottom of the screen.
- Select Modify Backup Configurations now.
- Tick off the directories and files you don’t need to backup.
- To close the Backup Settings, click next.
- Try backing up your company’s files or folders one more when you’re done.
Proceed to the next troubleshooting step if you are still unable to back up the corporate file.
8. Increase the ports of the Windows Firewall
Windows Firewall is a security tool that may prevent access to Intuit Data Protect if it detects misconfigured settings that could pose a threat. As a result, when attempting to backup, you encounter the “Intuit Data Protect not working” problem. This can be resolved.
- Using the Windows icon key, bring up the Windows Start menu.
- To access the Control Panel, type its name into the search bar, select it from the list of results, and click on it.
- Select Windows Firewall after clicking on System and Security.
- Select Advanced Settings at this point.
- Select the Inbound Rule option from the window’s left side. Next, select New Rule.
- The IDP port numbers should be entered in the Port Field:
- 80 incoming ports
- 443 outgoing ports; 16841
Intuit Data Protect connects to the Internet using HTTP ports 80 and 443. It must function if you can access secure websites and surf the Internet.
- Proceed as instructed by the screen.
- Proceed as before to establish Outbound Rules, except step 5, where you should select Outbound rather than Inbound.
Go to the next solution in case even adjusting the Windows Firewall setting, your IDP backup is still halted.
9. Delete the cookies, temporary files, cache, and SSL state from Internet Explorer
Intuit Data Protect can be used to verify that the most recent security standards are being applied, fix corrupted data, improve overall efficiency, and ensure safe and seamless backup operations by clearing the cache, cookies, temporary files, and SSL status.
- Open the Internet Explorer.
- Select Internet Options from the Tool menu by clicking on it.
- Note: To view the hidden tabs, press Alt if you are unable to locate the Tools tab in the window.
- Select the General tab.
- Click on Delete under Browsing History.
- Check the following boxes now:
- Internet temporary files and webpage files
- Website data and cookies
- The past
- Structured Data
- Structured Data
- After that, deselect the box for Preserving Favorites and webpage data.
- Click Delete to remove the aforementioned items.
- Navigate to the tab for Content.
- After selecting Clear SSL status, press OK.
After that, give IDP another go at creating a backup. Proceed to the next remedy if you are still having problems.
10. Include Reliable Websites
You want to apply Intuit Data Protect to reliable websites to guarantee its safe operation. By doing this, you can mitigate interruptions; enable smooth backups, lower errors brought on by inaccurate security settings, and guarantee that your backup operates well.
- Launch Internet Explorer.
- Navigate to the Tools tab, and then select Internet Options using the dropdown menu.
- In the Security tab, now uncheck the Enable Protected Mode checkbox.
- After choosing Trusted Sites, click Sites.
- Require server verification (https:) for all sites in this zone should also be unchecked.
- Place these in the “Add this website to the zone” section:
- intuit.com.
- backup.com.
- intuit.net
- Choose Close after that.
- Select Sites under the Privacy tab.
- In the Address of Website box, enter quickbooks.com and intuit.com.
- Lastly, select Allow each time you add a site address, then press OK.
11. Assign IDP Admin Rights
Intuit Data Protect may lack the appropriate administrative access to make the required adjustments to your machine. To ensure a trouble-free backup of your corporate file, you must launch the application as an administrator.
- Right-click the Intuit Data Protect icon from the Toolbar on your PC.
- Select the Properties.
- Go to the tab labeled Compatibility.
- In the Privilege Level section, tick the box for “Run this program as an administrator.”
- Select all the Change settings for all the users once you are done with above.
- To save these modifications, choose Apply and then click OK.
12. Update the IDP connection
When your IDP takes a long time and displays an error message stating, “Your session has expired,” it could be because of connectivity problems or other technical issues. It is advised to refresh the IDP application by logging out and returning in order to fix this.
- Log in to your company file and select File> Back Up Company> Setup/Activate Online Backup to access IDP. OR choose Open Intuit Data Protect by doing a right-click on the IDP icon in the Taskbar.
- Press the Sign Out button in the Intuit Data Protect window.
- After you click OK, IDP will sign you out.
- Now log back into IDP with your login credentials and email address.
- Click Sign in after entering the password.
- Once completed, your current options will be automatically set up in Intuit Data Protect.
- Follow the steps on your screen to finish the setup.
- Your corporate files and folders are being backed up by Intuit Data Protect.
13. Restart the file backup feature of Intuit Data Protect. [Mistake #2229]
IDP may take some time to finish the backup and display Error #2229, depending on how much data you are backing up during your initial backup. It will take longer for the initial IDP backup than for the subsequent ones. Consequently, it is advised that you wait until the procedure is finished.
- But if this isn’t your first backup and the problem persists, you can manually arrange IDP to backup the files once more by doing the steps listed below:
- Open QuickBooks on the system where your company file was saved. Use the F2 key to find out its location if you’re not sure where it is.
- Select File from the menu bar at the top.
- After selecting Backup Company, select Set Up/Activate Online Backup.
- Enter your email address while logging into IDP. Your QuickBooks login is not the same as this email.
- Press Continue after that.
- Proceed by selecting your QuickBooks company file and clicking next.
- Select the folders you wish to back up from your computer and click Proceed.
- Click Proceed after checking the Set Up/Activate Online Backup box.
- Choose Continue after scheduling the time for your daily backup.
- After completing the notification settings, click Proceed.
Depending on the quantity and size of the information, your initial backup could take several hours. You will just need a few minutes for your backups after that, so don’t worry.
14. If QuickBooks Desktop is open over a network disc
Intuit Data Protect can’t back up a corporate file that is currently open on a network drive.
- Shut off your QuickBooks company file.
- Select “Open Intuit Data Protect” from the Toolbar by performing a right-click on the IDP icon.
- Lastly, click Backup at this time.
To verify whether the IDP problem has been resolved, try backing up your files and folders one more.
Conclusion
You only need to read this thorough tutorial to understand the causes of Intuit Data Protects not working and how to fix them. Follow the troubleshooting procedures step by step. Contact our Advisor if you have any questions or, even after completing these procedures, you are unable to back up your company file. In no time, a QuickBooks Advisor will assist you in resolving the issue.
Frequently Asked Questions
Q1: How can I use Intuit Data Protect to back up my files?
Ans: To manually backup company files and folders using Intuit Data Protect, follow these steps:
To open Intuit Data Protect, right-click on the icon for it in the Windows toolbar and select Open.
- Right now, click Backup.
- Next, pick the folders and files you wish to backup, and then click Proceed.
- Select Backup at this time.
- A notification indicating the success of your backup will show up on your screen.
- Press OK to finish.
Q2: How does Intuit Data Protect work?
Ans: The backup service Intuit Data Protect is available for a monthly fee. You have the option to backup not just your PC but also your QuickBooks files and folders. Create a manual backup at any time, or schedule an automatic backup with Intuit Data Protect to occur once every day.
Q3: Why does Windows 11’s Intuit Data Protect not function?
Ans: It is possible that an obsolete version of QuickBooks or IDP, or a Windows firewall configured incorrectly, will prevent Intuit Data Protect from functioning. Download the most recent versions of QuickBooks and Intuit Data Protect, and make sure your firewall is configured correctly to ensure trouble-free IDP operation.
Q4: How can I configure Intuit Data Protect to backup automatically?
Ans: To configure an automated backup in Intuit Data Protect, adhere to the guidelines provided below:
- Open QuickBooks on a local PC or your server PC.
- Select File from the menu bar at the top.
- Select the backup provider, and then select Set Up/Activate Online Backup.
- Using the email address you used to register, log in to IDP and choose Continue.
- Select the QuickBooks company file you wish to backup by clicking on the Next button. Choose your folders and click Continue if you have the full PC plan.
- Check the box next to Back up local chosen documents, then click Proceed.
- Click Continue after scheduling your daily backup.
- Configure your notifications to receive updates on the status of your backup.
- In last you have to select continue.
Recent posts:
 QuickBooks Frozen on Remote Desktop
 PDF and Print Problems with QuickBooks Desktop
 QuickBooks Enterprise Force User Logoff
 Fix Web Connector Error QBWC1085 in QuickBooks Desktop
 Fix Error 1935 in QuickBooks Desktop
 Resolve QuickBooks Error 3371 Could Not Initialize License Properties
Powered by YARPP.