Error code 1712 typically arises when installing or updating QuickBooks Desktop on a host or server computer. This QuickBooks error 1712 usually appears with a message indicating that the required files for restoring the system are missing, preventing the update or installation from completing. This QuickBooks 1712 is caused due to damaged data files, corrupted folders, outdated or damaged operating systems, and issues like adware, spyware, or registry errors. Users while facing this error will experience system freezes, shutdown problems, blue screen errors, or recurring HTTP errors.
Solutions to fix QuickBooks Desktop error 1712 include using the Install Diagnostic Tool, performing a Windows update, and adjusting user account settings to grant administrative rights. In this article, you will understand the causes behind the occurrence of this error, its prerequisites, and solutions, and their step-by-step guide to fix this error.
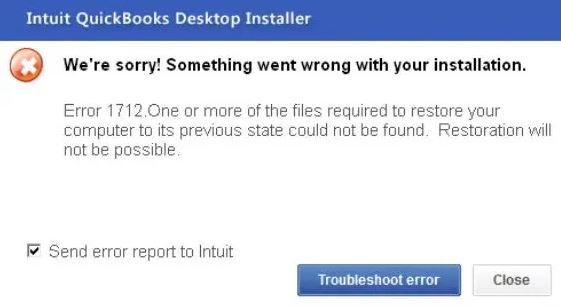
error code 1712
We’re sorry! Something went wrong with your installation.
Error 1712. One or more of the files required to restore your computer to its previous state could not be found. Restoration will not be possible.
Related Topic: QuickBooks Error 17337
Solutions to Fix QuickBooks Error 1712
Since there are many causes behind the occurrence of QuickBooks error 1712, the ways to resolve each one of them are different. Below are some advanced troubleshooting methods you can try:
Solution 1: Download and Install QuickBooks Desktop
You will have to download the QuickBooks Desktop application and reinstall it:
- Visit the QuickBooks version download page.
- Click the Change option.
- Now, you will have to choose the product version from the list of options mentioned in the drop-down menu.
- Choose your preferred version under the “Version” column.
- Click the Download button.
Solution 2: Use the QuickBooks Install Diagnostic Tool
The QuickBooks Install Diagnostic Tool helps automatically analyze and fix the core issue within the software. Follow the steps mentioned below to use the QuickBooks Install Diagnostic Tool to fix QB error 1712.
- Go to the official Intuit website.
- Search for the QBInstall Diagnostic Tool.
- Download the tool to your computer.
- Once downloaded, install the tool.
- Close all background applications to ensure smooth operation.
- Right-click on the tool and select Open.
- Choose the option, “I am having problems installing QuickBooks.”
- Click OK and reboot your system to apply the changes.
Solution 3: Run ‘Quick Fix My Program’ Using QuickBooks Tools Hub
Refer to the steps given below to fix error 1712 in QuickBooks using the QuickBooks Tool Hub:
Download the Tool Hub
- Launch a web browser on your system.
- After the file is downloaded, double-click the file to begin the installation procedure.
- Click on the Positive alternatives. Examples are allow, enable, and yes.
- Finally, click on Finish.
Launch the Tool Hub
- First, launch QB Tool Hub.
- Next, on the Tool hub home screen, select the Program Problems option.
- After that, click the Quick Fix My Program button.
- A window dialog box appears, asking for permission to let Quick Fix My Program to begin repairing QuickBooks Desktop. This will hardly take 5 minutes.
- Once the repair process is complete, you can check to see if the error has been repaired.
Solution 4: Update Windows
QuickBooks error code 1712 sometimes occurs when you’re using an outdated version of Windows. You can fix the error by updating Windows. Here are the steps to update Windows and resolve this error.
- Hit the Start button and navigate to the System Settings option.
- From the settings menu, you are required to select the Update & Security tab.
- Now, click the Windows Update option and select the Check for Updates button.
- Lastly, you will have to click on Get Updates if any updates are pending.
Windows 10:
- Press the Windows key, then enter Settings.
- From the drop-down menu, select Update and Security, then click the Windows Update button.
- Clicking the Check for Updates button will show you whether there are any new versions available.
- Select the Restart Now option to start the update installation process.
Windows 11:
- You can check for some of these little hints if you want to get the latest Windows (Windows 11). i3 CPU with a clock speed of at least 1GHz, 4GB RAM, 512 GB HDD or SSD (Windows 11 exceeds the 40 GB limit), internal graphic card, and a solid network.
- If you already have Windows 11, proceed with the procedures below.
- Now, click the Windows icon, type settings into the search bar, and press the Enter key.
- In the left pane of the Windows 11 Settings menu, select the Windows Update option.
- If your version of Windows can upgrade to the most recent version, you will see the message-Updates available to download. If any updates are pending, you may see the download and install all button.
- If you have no pending updates, you will receive the you’re up to date message.
Solution 5: Assign Admin Rights to QuickBooks
You need admin rights to perform certain tasks. In case face error 1712 in QuickBooks while you’re installing or updating, refer to the steps given below:
- Open the Start Menu and search for the Control Panel.
- Navigate to User Accounts.
- Find QBDataServiceUserXX and click on it.
- Now, you will have to select the Change Account Type option and change it to Administrator.
- Save changes by clicking Apply.
- Repeat this for all QuickBooks database server managers on your system.
Solution 6: Update Application Data in the Registry
Users can follow the steps given below to fix error 1712 in QuickBooks if the error is triggered due to the system registry:
- Press the Start button and search for regedit.exe.
- Navigate to the path:
HKEY_CURRENT_USER\Software\Microsoft\Windows\CurrentVersion\Explorer\User Shell Folders.
- Double-click on the App Data entry.
- Replace the original value with your local profile path.
- Reopen QuickBooks to check if the error is resolved.
Causes of QuickBooks Error Code 1712
QuickBooks error code 1712 can arise after installing or uninstalling a program that requires a system reboot or following a QBDT update. Here are some additional potential causes for this error:
- Damaged Files: Data files related to QuickBooks Desktop (QBDT) are damaged/corrupted.
- Software Update: Recent changes have been made to QBDT on the same system.
- Incorrect Installation: You are installing QuickBooks in a damaged or encrypted folder.
- Corrupted System: Malicious software, including adware, spyware, or viruses, has affected the system.
- Registry errors: There’s some software corruption due to registry errors.
- Outdated Software: You are facing error 1712 because you applied a recent update to the QuickBooks software while using an outdated version.
By following these steps, you should be able to fix QuickBooks error 1712 and continue using the software smoothly. However, you can always contact the QuickBooks Support team if you’re unable to resolve the error manually.
Conclusion
Facing QuickBooks error 1712 can be frustrating, but with the right steps, it can be resolved effectively. Whether the issue stems from corrupted files, outdated software, or insufficient permissions, following the troubleshooting methods mentioned in this article such as reinstalling QuickBooks, using diagnostic tools, or updating Windows, you will be able to restore your system to normal. If these solutions don’t resolve this issue, you must reach out to QuickBooks support without delaying any further. By ensuring that your system is clean, updated, and configured correctly, you can enjoy a smoother QuickBooks experience without interruptions.


