

QuickBooks Desktop is widely used by small and medium-sized businesses to manage accounting, payroll, and financial reporting. One of its most useful capabilities is Multi-User Mode, which allows multiple users to access the same company file simultaneously over a network. However, this feature can sometimes fail due to connectivity issues, which can trigger QuickBooks Error H202. The error message H202 in QuickBooks Desktop usually states:
“This company file is on another computer, and QuickBooks needs some help connecting.”
QuickBooks Error H202 indicates that the workstation cannot communicate with the server computer hosting the company file. As a result, users are unable to switch to Multi-User Mode or open the shared company file.
In this guide, we will discuss the causes, symptoms, prerequisites, and proven solutions to resolve QuickBooks Multi-User Mode Error H202.
What Causes QuickBooks Error H202?
QuickBooks Error H202 occurs when a workstation fails to connect to the server that hosts the company file in QuickBooks Desktop. The most common causes of the error message H202 in QuickBooks Desktop include:
- Improper Multi-User Hosting Setup
- Corrupted Network Descriptor (.ND) File
- Inactive QuickBooks Database Services
- Firewall or Antivirus Restrictions
- DNS Resolution or Network Connectivity Problems
- Insufficient Shared Folder Permissions
- Incorrect Server Path or IP Configuration
- Outdated QuickBooks Installation
Common Symptoms of Error H202
When QuickBooks Desktop triggers Error H202, the affected workstation cannot communicate with the server that hosts the company file. Here are the signs of the QuickBooks Error H202.
- Multi-User Mode Fails to Start
- H202 Error Message Appears
- Workstations cannot open the shared company file hosted on the server
- QuickBooks Freezes or Runs Slowly
- Unexpected Disconnection from the Company File
- Server File Opens Locally but Not on Workstations
- Network Drives or Shared Folders Become Unavailable
- Connection Timeouts or Network Errors
- Some Users Can Connect While Others Cannot
What are the Prerequisites to Fix QuickBooks Multi-User Mode Error H202?
Before you begin troubleshooting QuickBooks Desktop Error H202, make sure your system and network meet the following requirements. These preliminary checks help you avoid interruptions and improve the chances of resolving the issue quickly.
- Save a current backup to protect your accounting data before making any system changes.
- Use an admin account to modify services, firewall settings, and folder permissions.
- Confirm that the server and all workstations are connected to the same local network.
- Identify the computer that stores the company’s (.QBW) file.
- Install the latest updates on both the server and all client systems.
- Download Intuit’s diagnostic utility to access tools like QuickBooks File Doctor and Database Server Manager.
- Ensure only the server computer has hosting enabled.
- Verify that all users have full read/write access to the company file folder.
- Be prepared to adjust firewall or antivirus settings if they block QuickBooks communication.
- Reboot the server and workstations to clear temporary network or service-related issues.
How to Fix QuickBooks Error H202
Below are the refined solutions to fix QuickBooks Error H202 in QuickBooks Desktop. Each solution now includes a short intro line followed by clear steps.
Method 1: Run QuickBooks Database Server Manager
This solution helps you scan the company file folder and fix network-related issues. Here are the steps to run QuickBooks Database Server Manager using QuickBooks Tool Hub.
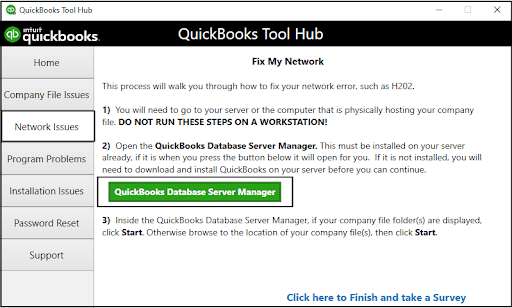
Step 1: Download QuickBooks Tool Hub
Here are the steps to download and install QuickBooks Tool Hub correctly:
- Close all QuickBooks programs running on your system.
- Download the latest version of QuickBooks Tool Hub from the official website.
- Save the file (QuickBooksToolHub.exe) in an easily accessible location.
- Follow the on-screen instructions and accept the terms and conditions.
- Double-click the QuickBooks Tool Hub icon to open it.
Step 2: Use QuickBooks Database Server Manager
Here are the steps to scan your company file folder using Database Server Manager:
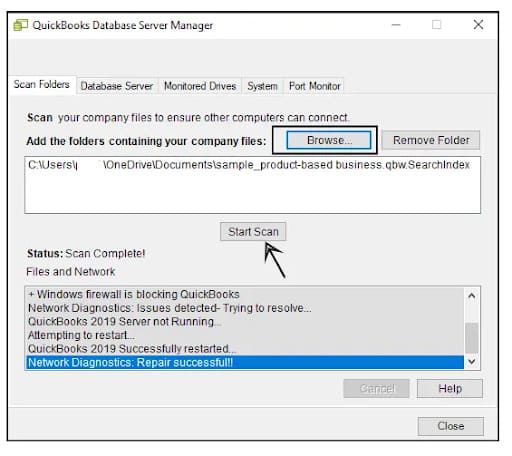
- Open QuickBooks Tool Hub and go to the Network Issues section.
- Select QuickBooks Database Server Manager (install it on the server if needed).
- Click Start Scan.
- If no company file appears, click Browse, locate the file, then click Start Scan again.
- The tool will automatically fix firewall permissions.
- Click Close after completion.
- Open QuickBooks on all workstations.
- Go to the File menu and select Switch to Multi-user Mode.
Method 2: Check QuickBooks Services on the Server
This solution ensures that hosting and required services are running properly. Here are the steps to enable hosting and verify QuickBooks services.
Step 1: Enable Multi-User Hosting
- Here are the steps to turn on hosting on the server system.
- Open QuickBooks on the server.
- Go to the File menu and select Utilities.
- Click Host Multi-User Access if the option appears.
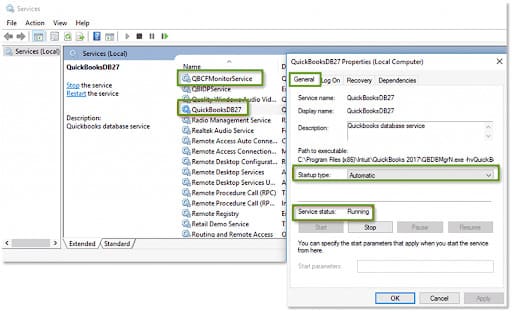
Step 2: Start Required Services
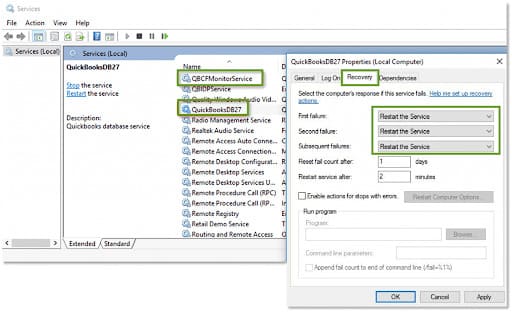
Here are the steps to ensure QuickBooks services run properly.
- Open the Start menu and search for Run.
- Type services.msc and press Enter.
- Locate QuickBooksDBXX.
- Set Startup Type to Automatic.
- Click Start if the service is not running.
- Open the Recovery tab.
- Set all failures (First, Second, Subsequent) to restart the Service.
- Click Apply and OK.
- Repeat the same steps for QBCFMonitorService.
- Open QuickBooks on workstations and switch to Multi-User Mode.
Method 3: Set Folder Permissions in Windows
This solution allows QuickBooks services to access the company file folder. Here are the steps to share the company file folder with proper permissions.
- Open File Explorer on the server.
- Locate the company file folder.
- Right-click the folder and select Properties.
- Go to the Sharing tab.
- Click Share/Add and select QBDataServiceUserXX.
- Set permission level to Full Control.
- Click Share to save changes.
Method 4: Configure Firewall Settings
This solution prevents the firewall or antivirus software from blocking QuickBooks communication. Here are the steps to allow QuickBooks through firewall settings.
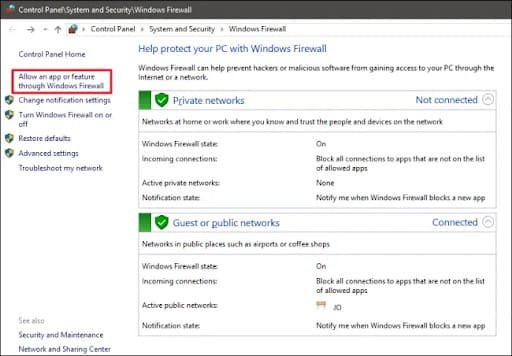
- Check Windows Firewall and antivirus settings.
- Allow QuickBooks access on the server system.
- Open QuickBooks on workstations after changes.
- Go to File and select Switch to Multi-user Mode.
Method 5: Rename .TLG and .ND Files
This solution refreshes damaged configuration files used by QuickBooks. Here are the steps to rename and regenerate these files.
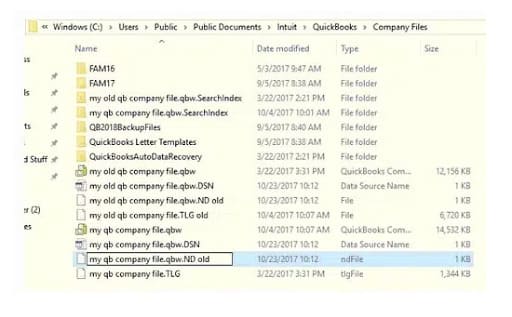
- Close QuickBooks and all running programs.
- Open the company file folder on the server.
- Find the .TLG file.
- Right-click and select Rename.
- Add .old at the end of the file name.
- Repeat the same steps for the .ND file.
- Close the folder.
- QuickBooks will automatically recreate fresh files.
- Open the company file by holding the Alt key until it loads.
Method 6: Ping the Server from Workstations
This solution checks whether the server is reachable over the network. Here are the steps to test network connectivity between systems.
- Enable Network Discovery on the server and the workstation.
- Open Network and Sharing Center.
- Turn on Network Discovery and File and Printer Sharing.
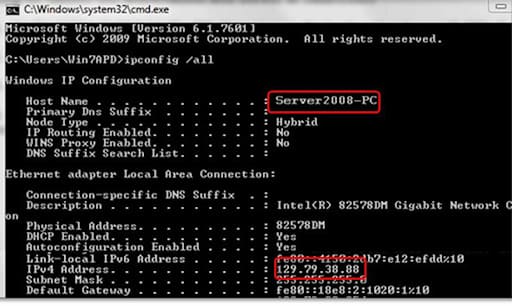
On Server
Here are the steps to find the server hostname.
- Open Run and type CMD.
- Enter ipconfig /all.
- Note the Hostname.
On Workstation
Here are the steps to test the server connection using the ping command.
- Open CMD.
- Type ping [server name] (without brackets).
- Press Enter.
- Repeat for all workstations.
- Ensure there is no packet loss.
Method 7: Add Server to Windows Hosts File
This solution fixes name resolution issues between the workstation and the server. Here are the steps to map the server manually in the hosts file.
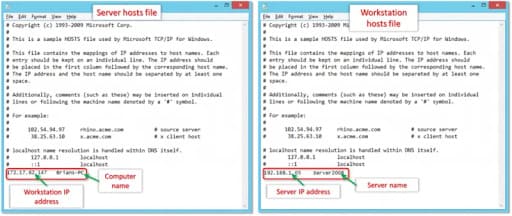
- Go to C:\Windows\System32\drivers\etc.
- Open the hosts file in Notepad.
- Scroll to the bottom.
- Enter server IP address.
- Press Tab and enter the server name.
- Press Ctrl + S to save changes.
- Close the file.
Method 8: Edit QBGlobalAppConfig.ini on Fedora Linux Server
This solution corrects port configuration issues on Linux servers. Here are the steps to update the configuration file on Linux.
- Open the QBGlobalAppConfig.ini file.
- Launch Linux Terminal.
- Ensure there are no spaces around equal (=) signs in port settings.
- Install Linux Database Server Manager for port details.
- Save the file.
- Restart QBDBFILEMON and QBDBMGRN services.
Method 9: Repair QuickBooks from the Control Panel
This solution fixes damaged installation files. Here are the steps to repair the QuickBooks installation.
- Close QuickBooks completely.
- Open Control Panel.
- Go to Programs and Features.
- Select QuickBooks.
- Click Change > Repair.
- Follow on-screen instructions.
- Update QuickBooks after repair.
- Verify by opening the company file.
Method 10: Create a New Company File Folder
This solution fixes folder-level permission or corruption issues. Here are the steps to move the company file to a new folder.
- Create a new folder on the server.
- Set proper sharing permissions.
- Copy the .QBW file into the new folder.
- Open the company file in Multi-User Mode.
Method 11: Move the Company File to a New Location
This solution fixes file path or folder-related access issues. Here are the steps to relocate the company file safely.
- Create a new folder on Drive C:.
- Copy the company file and .TLG file.
- Paste them into the new folder.
- Try opening the file in Multi-User Mode.
Method 12: Update Firewall Ports for QuickBooks
This solution ensures proper communication between the server and workstations. Here are the steps to configure firewall ports for your QuickBooks version.
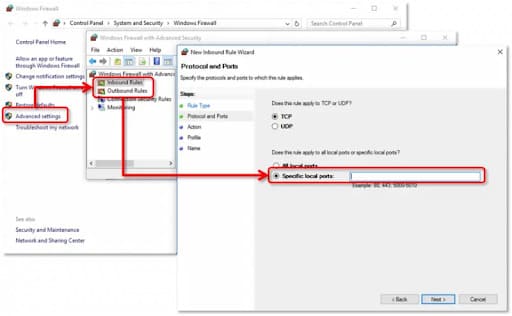
- Ensure the firewall does not block Multi-User Mode.
- Add required ports based on your QuickBooks version.
- Follow version-specific port list:
- 2016: 8019, 56726, 55368–55372
- 2017: 8019, 56727, 55373–55377
- 2018: 8019, 56728, 55378–55382
- 2019: Dynamic ports (auto-managed)
- 2022: 8019, 56727, 55373–55377
- 2023: 8019, 56728, 55378–55382
- 2024: 8019, 56728, 55378–55382
- 2025: 8019, 56730, 55388
- 2026: 8019, 56731, 55393
Method 13: Set Hosting to Local Files Only
This solution ensures that only the correct system hosts the company file. Here are the steps to restrict hosting to local files only.
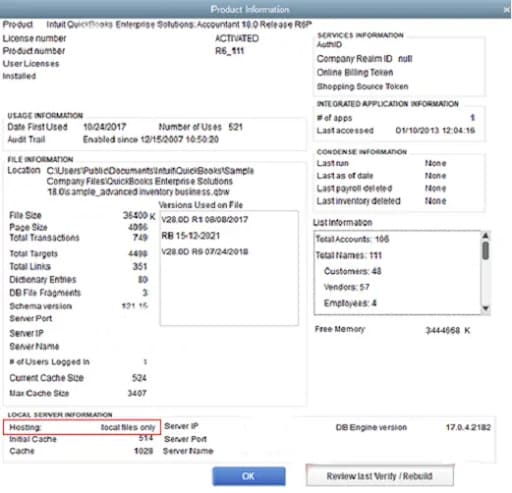
- Ensure no other system is hosting the company file.
- Open QuickBooks and press F2.
- Check the Product Information window.
- Set Hosting to Local files only under local server information.
You may read this: How to Resolve Error H505 in QuickBooks Desktop
How to Prevent QuickBooks Error H202
To keep QuickBooks Desktop running smoothly in Multi-User Mode, follow these preventive measures. Here are the tips to prevent QuickBooks Desktop Error Code H202.
- Use a Dedicated Host Server: Store the company file on a reliable server or primary host computer rather than on a workstation or external drive.
- Enable Hosting on Only One Computer: Configure only the server to host the company file and disable hosting on all workstations.
- Keep QuickBooks and Server Manager Updated: Install the latest updates for QuickBooks Desktop and QuickBooks Database Server Manager.
- Assign Static IP Addresses: Set fixed IP addresses for the server and client systems to maintain a stable network path.
- Allow QuickBooks Through the Firewall: Create exceptions for QuickBooks ports and related services in your firewall and antivirus software.
- Monitor QuickBooks Services: Ensure QuickBooksDBXX and QBCFMonitorService start automatically and remain active.
- Verify Shared Folder Permissions: Grant users full read and write access to the company file folder.
- Maintain Reliable DNS Resolution: Update DNS records or hosts file entries so workstations can consistently locate the server.
- Test Network Stability Regularly: Ping the server periodically to identify packet loss or connection interruptions.
- Limit VPN Interference: Avoid running QuickBooks in multi-user mode over unstable VPN connections.
- Rescan the Company File Folder After Changes: Run QuickBooks Database Server Manager whenever you move or restore the company file.
- Create Regular Backups: Schedule automatic backups to protect your accounting data.
Conclusion
QuickBooks Error H202 arises from network and hosting issues in QuickBooks multi-user mode. You can resolve it by applying the above solutions and restoring proper server communication. Follow the correct hosting setup, firewall rules, and network configuration to prevent QuickBooks multi-user mode error H202 and maintain smooth, uninterrupted accounting operations.
 +1-800-961-4963