

A Journal entry in QuickBooks Desktop refers to a manual record of a financial transaction that affects a business’s accounts. It’s an essential part of the double-entry accounting method, which ensures that each transaction is recorded accurately in at least two accounts: one account is debited, and another is credited. By following this method, QuickBooks maintains balanced financial records where the total debits equal the total credits.
Managing Journal entries in QuickBooks Desktop is crucial for maintaining accurate financial records. Whether you’re adding, editing, reversing, or deleting journal entries, QuickBooks makes it easy to perform these actions. Below is a step-by-step guide to help you manage journal entries effectively.
What are Journal Entries in QuickBooks?
Journal entries record a business’s financial transactions in an organized way. They help businesses track money coming in and going out while keeping financial records accurate. QuickBooks simplifies journal entry creation and management, so you do not need advanced accounting knowledge to maintain your records.
QuickBooks supports different types of journal entries, including standard, reversing, and recurring entries. Each type serves a specific accounting purpose and helps businesses record different transactions or adjustments. Understanding these entry types helps you choose the right option and maintain accurate financial records.
Understanding Different Journal Entry Types
QuickBooks Desktop offers different journal entry options for recording adjustments and correcting transactions. Understanding their purpose can help you maintain accurate financial records.
- Standard Journal Entries: Record transactions using Debit and Credit amounts.
- Reversing Journal Entries: Offset an existing entry by switching the Debit and Credit amounts.
- Recurring Entries: Some QuickBooks versions support recurring transactions for regularly occurring entries.
How to Create and Manage Journal Entries in QuickBooks Desktop
QuickBooks Desktop lets you create and manage QuickBooks Desktop journal entries to adjust account balances and record financial transactions. You need to enter the correct accounts and amounts while making sure that the total debits equal the total credits. Here is how to create a journal entry in QuickBooks Desktop:
Step 1: Open the Make General Journal Entries Window
- Open your QuickBooks Desktop company file.
- Select Company from the top menu.
- Choose Make General Journal Entries.
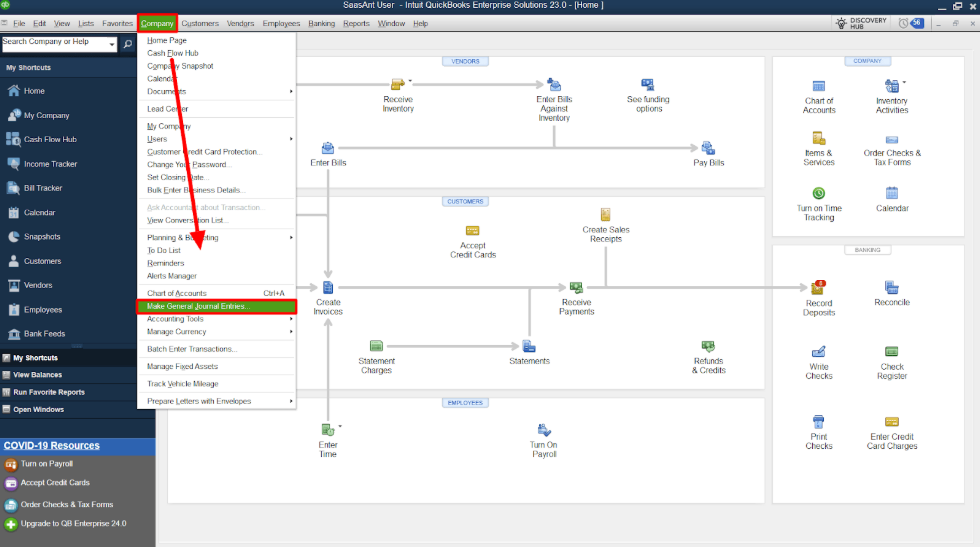
Step 2: Enter the Journal Entry Details
- Enter the required date and entry number.
- Select the appropriate account in the Account column.
- Enter the transaction amount in the Debit or Credit column.
- Add the required accounts and amounts for the transaction.
- Check that the total debit amount matches the total credit amount.
QuickBooks Desktop requires the debit and credit totals to balance before you save the journal entry. You can add other details, such as a memo, when needed.
Step 3: Save the Journal Entry
- After reviewing the information, select Save or Save & Close to record the journal entry.
- Choose Save & New when you want to save the current entry and immediately create another one.
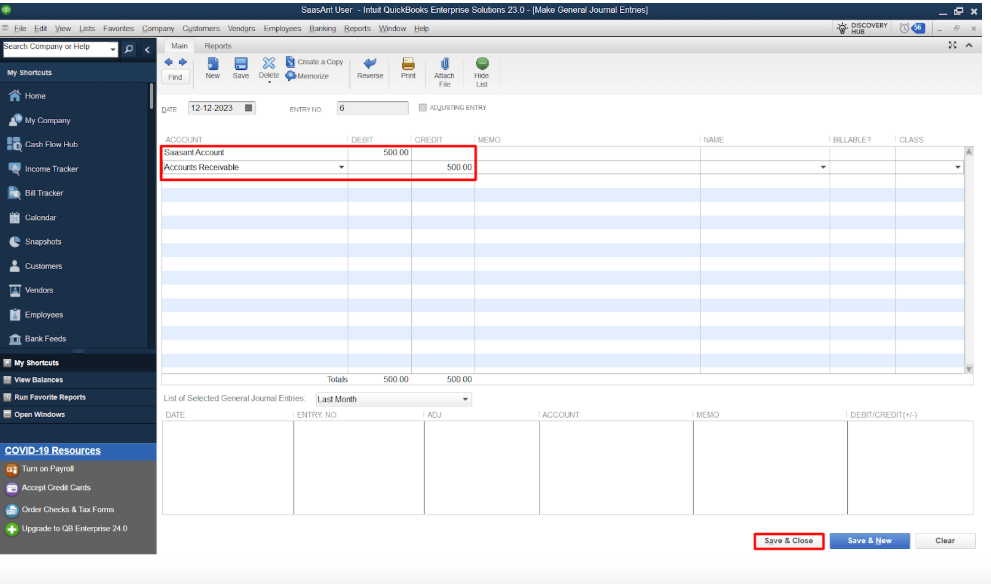
Review the entry and its effect on the related account balances after saving it. Accurate account selection and balanced debit and credit amounts help maintain reliable financial records.
How to Edit Existing Journal Entry in QuickBooks Desktop?
QuickBooks Desktop lets you update an existing journal entry when you need to correct or change its details.
Follow these steps to edit a journal entry in QuickBooks Desktop:
Step 1: Open the Journal Entry Window
- Open your QuickBooks Desktop company file.
- Select Company from the top menu.
- Choose Make General Journal Entries.
Step 2: Find the Journal Entry
- Select Find in the journal entry window.
- Enter details such as the Name, Date, Entry No., or Amount to search for the entry.
- Select Find to display the matching journal entries.
- Double-click the journal entry you want to update.
Step 3: Make the Required Changes
- Review the existing journal entry details.
- Update the required information, such as the accounts, Debit, Credit, or memo.
- Check the changes carefully to make sure the journal entry remains accurate and balanced.
Step 4: Save the Updated Journal Entry
- Select Save & Close to save the changes and close the journal entry window.
- Review the updated transaction to confirm that QuickBooks Desktop recorded the changes correctly.
Read more: Reconcile an Account in QuickBooks Desktop
How to Delete a Journal Entry in QuickBooks Desktop?
You can delete journal entry in QuickBooks Desktop when you no longer need a mistakenly created entry in your books. Review the entry carefully before deleting it because removing it affects your account balances and financial records.
Step 1: Open the Make General Journal Entries Window
- Open your QuickBooks Desktop company file.
- Select Company from the top menu.
- Choose Make General Journal Entries.
Step 2: Find the Journal Entry
- Select Find in the Make General Journal Entries window.
- Enter details such as the Name, Date, Entry No., or Amount to locate the required journal entry.
- Select Find to view the matching entries.
- Open the journal entry you want to remove.
Step 3: Delete the Journal Entry
- Select Delete from the Edit menu.
- Select OK when QuickBooks asks you to confirm the deletion.
QuickBooks removes the journal entry from your records after you confirm the deletion. Review the related account balances and financial reports after deleting the entry to make sure your records remain accurate.
How to Review Journal Entries in QuickBooks Desktop?
Reviewing journal entries in QuickBooks Desktop helps you check recorded transactions and verify the debit and credit details. You can review account activity and use reports to get a clearer view of your financial records.
Review Journal Entries from the Chart of Accounts
The Chart of Accounts provides a structured view of your business accounts and their transaction activity. You can review account records to check the transactions associated with specific accounts.
This view helps you examine activity related to income, expenses, assets, liabilities, and equity. Reviewing these transactions makes it easier to identify incorrect entries or account balances that need attention.
Review Journal Entries from the Reports Menu
QuickBooks Desktop provides reports that help you review and analyze your financial data. Open the Reports menu to access reports related to your business transactions and account activity.
You can use reports such as the Balance Sheet and Profit & Loss to review the effect of recorded transactions on your accounts. You can customize reports based on the information you need and review individual transactions for further details.
Common Journal Entry Errors in QuickBooks Desktop
QuickBooks Desktop users may face different issues when you create, edit, save, or review journal entries. Incorrect amounts, account selection, company file problems, and user permissions often cause these issues.
Unbalanced Journal Entry
QuickBooks Desktop requires the total Debit amount to equal the total Credit amount. A calculation mistake, missing account line, or incorrect amount can leave the journal entry unbalanced and prevent you from saving it.
Journal Entry Not Saving
QuickBooks Desktop may stop you from saving a journal entry when you leave required details incomplete or enter incorrect information. Company file problems can prevent the software from saving the entry correctly.
Journal Entry Not Appearing
Incorrect dates, account selections, or report filters can make a journal entry difficult to find in reports or account records. Check these details when an entry does not appear where expected.
Incorrect Account Posting
Selecting the wrong account when creating a journal entry posts the transaction to the wrong ledger. This error affects account balances and financial reports.
Permission Issues
User permissions in a multi-user setup may restrict access to journal entries. Users need the appropriate permissions to create or edit journal entries.
Company File Issues
A damaged QuickBooks company file can affect journal entries and other transactions. File issues can cause entries to save incorrectly, appear inaccurate, or fail to appear in reports.
Multi-User Conflicts
Multiple users accessing or modifying accounting data at the same time can create conflicts. These conflicts can affect journal entry updates and transaction records.
How to Troubleshoot Journal Entry Errors
Follow these steps to resolve common journal entry issues:
- Check that the Debit and Credit amounts are equal.
- Verify that you selected the correct accounts.
- Review the journal entry date and report filters.
- Check your user permissions in a multi-user environment.
- Update QuickBooks Desktop to the latest available release.
- Use QuickBooks Tool Hub to diagnose company file issues.
- Restart QuickBooks Desktop and your computer to clear temporary issues.
Conclusion
QuickBooks Desktop provides tools to manage QuickBooks Desktop journal entries. Users can create, find, edit, review, and delete journal entries with ease. Accurate account selection and balanced Debit and Credit amounts help maintain reliable financial records. Review your journal entries regularly and check related reports for discrepancies. A careful approach to journal entry management helps you keep your company file organized and your financial reports accurate.
Frequently Asked Questions
What is a journal entry in QuickBooks Desktop?
A journal entry records a financial transaction by adjusting one or more accounts through Debit and Credit amounts. QuickBooks Desktop requires the total Debit and Credit amounts to match before you save the entry.
How do I create a journal entry in QuickBooks Desktop?
Go to Company>> Make General Journal Entries, enter the required transaction details, make sure the Debit and Credit amounts match, and select Save or Save & Close.
How do I edit a journal entry in QuickBooks Desktop?
Go to Company>>Make General Journal Entries, select Find, locate the required entry, and open it. Make the necessary changes, then select Save or Save & Close and confirm the changes.
How do I delete a journal entry in QuickBooks Desktop?
Open Company>>Make General Journal Entries, select Find, locate and open the journal entry, then select Delete from the Edit menu. Select OK to confirm.
Why won’t QuickBooks Desktop save my journal entry?
Check that you completed the required fields and that the total Debit amount equals the total Credit amount. Review the account selection and check the company file for potential issues if the entry still does not save.
How can I review a journal entry in QuickBooks Desktop?
Open the journal entry from Make General Journal Entries and review its account, Debit, Credit, date, and other details. You can use the Transaction Journal report to examine the accounting details of a selected transaction.
 +1-800-961-4963