

QuickBooks Error 6175, 0 stops you from accessing your company file and using QuickBooks Desktop in multi-user mode. This error can interrupt your accounting work, especially when several users need to work on the same company file. You can fix this error by following the right troubleshooting steps. This guide explains simple ways to fix QuickBooks Error 6175 0 and access your company file again.
What is QuickBooks Error 6175, 0?
QuickBooks Error 6175,0 can occur when QuickBooks Desktop has trouble accessing a company file in a multi-user environment. The error is often related to incorrect hosting settings or communication problems between QuickBooks and the computer hosting the company file.
QuickBooks displays the following message when this error occurs:
“QuickBooks is trying to access the company file, but the database server is not responding. Error: -6175, 0 – We’re sorry, but QuickBooks can’t open your company file.”
What Causes QuickBooks Error 6175, 0?
Generally, QuickBooks company file error 6175 occurs when QuickBooks Desktop has trouble using multi-user mode or accessing the company file. Hosting settings, network connections, or file permissions often cause this error. Common causes include:
- QuickBooks Desktop is not installed or configured correctly on the server.
- A firewall or antivirus program blocks communication between the server and workstations.
- QuickBooks Database Server Manager cannot properly detect or provide network access to the company file.
- Incorrect Windows file permissions restrict access to the company file.
- Incorrect hosting settings prevent QuickBooks from running the company file in multi-user mode.
- QuickBooks Database Server Manager is not running correctly or cannot provide network access to the company file.
How do I Fix Error 6175, 0 in QuickBooks Desktop?
The following methods will help you troubleshoot the error and restore access to your QuickBooks company file. Start with the hosting settings and move through the remaining solutions when the error continues.
Method 1: Verify Hosting Settings on the Server and Workstations
Incorrect hosting settings on the server or workstations often interfere with QuickBooks multi-user mode and trigger Error 6175, 0. The server should be the only computer that hosts the company file. Check the hosting settings on each workstation, then verify the settings on the server.
Step 1: Check the Hosting Settings on Workstations
A workstation might have hosting enabled by mistake, which prevents QuickBooks from accessing the company file correctly. Check the hosting settings on every workstation where you encounter Error 6175, 0.
- Open QuickBooks Desktop on the workstation.
- Select File from the top menu and choose Utilities.
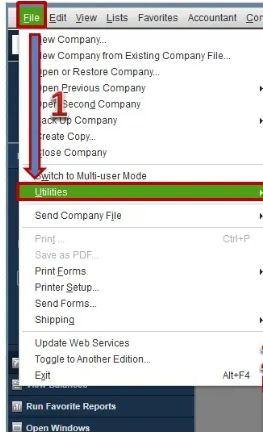
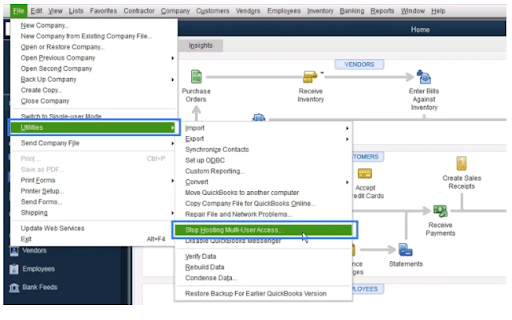
- Check the hosting option:
- Select Stop Hosting Multi-User Access when this option appears.
- Leave the settings unchanged when you see Host Multi-User Access.
- Repeat these steps on every workstation that displays QuickBooks Error 6175, 0.
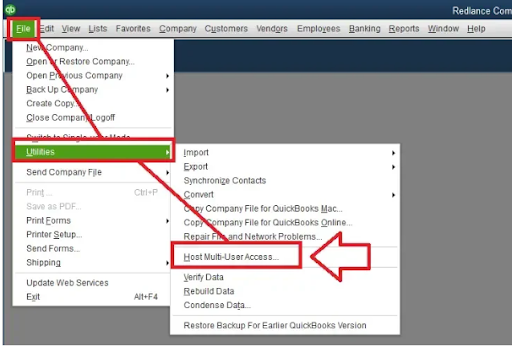
Step 2: Check the Server Configuration
The next steps depend on your server configuration.
If QuickBooks Desktop is installed on the server:
- Open QuickBooks Desktop on the server.
- Go to File > Utilities.
- Select Host Multi-User Access if this option appears.
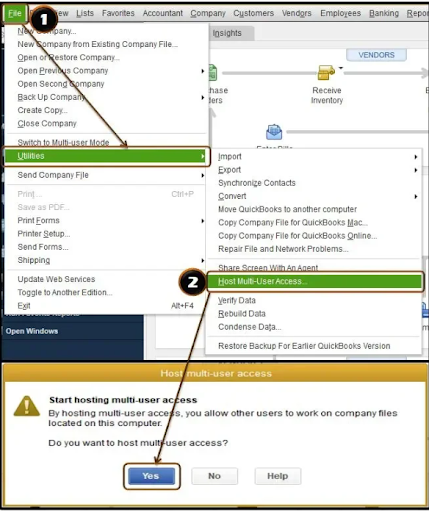
- Go back to File > Utilities and select Stop Hosting Multi-User Access.
- Open File > Utilities again and select Host Multi-User Access.
If only QuickBooks Database Server Manager is installed on the server:
- Open the Windows Start menu on the server.
- Search for and open QuickBooks Database Server Manager.
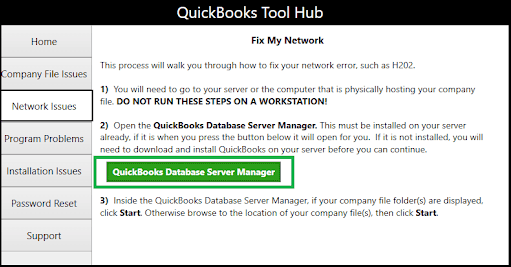
- Select the Scan Folders tab.
- Click Browse and locate the folder that contains your QuickBooks company file.
- Select the folder and start the scan.
After completing the steps that apply to your server configuration, try opening the company file in multi-user mode.
Method 2: Run QuickBooks File Doctor to Fix QuickBooks Desktop Error 6175 0
QuickBooks File Doctor helps identify and repair issues related to company files and network connectivity. You need the QuickBooks Tool Hub to access this utility. Install the latest version of Tool Hub before running File Doctor.
Step 1: Download and Install QuickBooks Tool Hub
- Close QuickBooks Desktop on your computer.
- Download the latest version of QuickBooks Tool Hub from the official Intuit website.
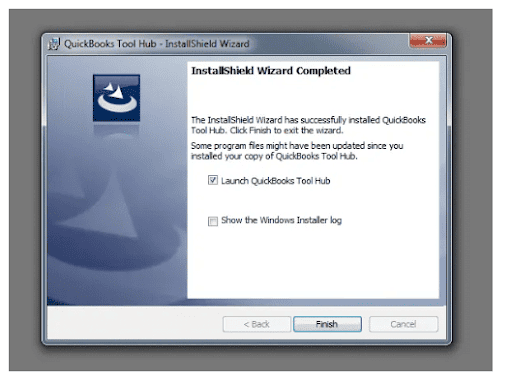
- Save the downloaded QuickBooksToolHub.exe file in an easy-to-find location, such as the Downloads folder or Windows desktop.
- Open the downloaded file to start the installation.
- Follow the on-screen instructions to complete the installation.
- Double-click the QuickBooks Tool Hub icon to open the utility.
Note: Check the Tool Hub version after opening the application. The version number appears at the bottom of the window. Using the latest version helps ensure that you have the most recent troubleshooting components.
If you can’t find the Tool Hub icon, open the Windows Start menu and search for QuickBooks Tool Hub.
Step 2: Run QuickBooks File Doctor
- Open QuickBooks Tool Hub.
- Select Company File Issues from the left panel.
- Click Run QuickBooks File Doctor.
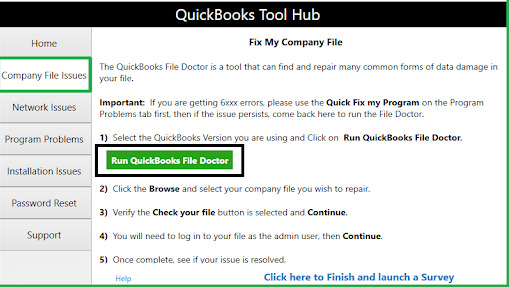
- Wait for the utility to open. It could take up to a minute.
Note: Search for QuickBooks File Doctor through the Windows Start menu and open it manually when the utility does not launch from Tool Hub.
Step 3: Select and Scan the Company File
- Open QuickBooks File Doctor.
- Select the company file you want to check from the drop-down list.
- Click Browse when the company file does not appear in the list, then locate and select the file manually.
- Select Check your file and network.
- Click Continue.
- Enter your QuickBooks admin password when prompted.
- Click Next to start the diagnostic process.
After the scan finishes, open QuickBooks and check if Error 6175, 0 has been resolved. Move to the next method when the error continues to appear.
Method 3: Configure Firewall and Security Settings Manually
Windows Firewall or other security settings could block QuickBooks from communicating with the company file or network. Creating the required firewall exceptions allows QuickBooks programs to communicate through the network and helps resolve Error 6175, 0.
Step 1: Create Firewall Port Exceptions for QuickBooks
Users with multiple versions of QuickBooks Desktop installed on the same computer should create the required port exceptions for each version.
- Open the Windows Start menu and search for Windows Firewall.
- Open Windows Firewall, then select Advanced Settings.
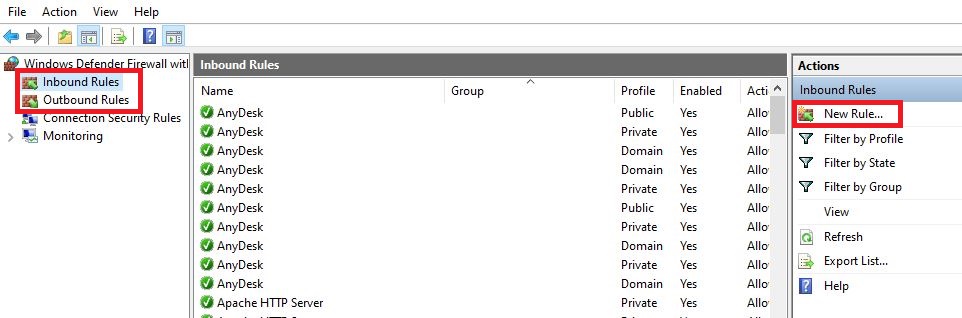
- Select Inbound Rules and click New Rule.
- Choose Port and click Next.
- Make sure TCP is selected.
- Enter the required QuickBooks ports in the Specific local ports field.
Use the ports associated with your QuickBooks Desktop version:
- QuickBooks Desktop 2020 and later: 8019, XXXXX
- QuickBooks Desktop 2019: 8019, XXXXX
- QuickBooks Desktop 2018: 8019, 56728, 55378-55382
- QuickBooks Desktop 2017: 8019, 56727, 55373-55377
Step 2: Find the Dynamic Port Number
QuickBooks Desktop uses a dynamic port, so you need to identify the port assigned to your installed version.
- Open the Windows Start menu and search for QuickBooks Database Server Manager.
- Launch QuickBooks Database Server Manager.
- Open the Port Monitor tab.
- Locate your QuickBooks version and note the port number shown for it.
- Enter this port number in the Specific local ports field when creating the firewall rule.
- Click Next.
- Select Allow the Connection and click Next.
- Make sure all available profiles are selected, then click Next.
- Enter a name such as QBPorts(year) for the rule.
- Click Finish to create the inbound port exception.
Step 3: Create Outbound Port Rules
Repeat the process to create an outbound firewall rule. Select Outbound Rules instead of Inbound Rules when you reach the Advanced Settings window.
After you create both inbound and outbound rules, reopen QuickBooks Desktop and try to access the company file. Check if QuickBooks Error 6175, 0 no longer appears.
Method 4: Create a Windows User and Assign Administrator Rights
QuickBooks Desktop requires appropriate Windows permissions to run multi-user features smoothly. Administrator access helps users manage settings such as firewall rules and folder permissions. QuickBooks services, including QuickBooks Database Server Manager, require the necessary permissions to access and host company files across the network.
Step 1: Create a Windows User with Administrator Rights
For Windows Small Business Server 2011 and Windows Small Business Server 2008 R2, follow these steps:
- Click the Windows Start menu.
- Select All Programs, open Windows Small Business Server, and choose Windows SBS Console.
- Select Users and Groups.
- Open the Add a new user account section.
- Enter the required user information.
- Follow the instructions provided by the Add a New User Account wizard.
- Assign administrator rights to the newly created Windows user.
- Click Finish to complete the setup.
Step 2: Assign Administrator Rights to QuickBooks Services
QuickBooks services need sufficient Windows permissions to support multi-user hosting. QuickBooks Database Server Manager creates a dedicated Windows user during installation. Assign administrator rights to the relevant QBDataServiceUserXX account so the service has the required access.
- Close QuickBooks Desktop.
- Open the Windows Start menu.
- Go to Control Panel and select User Accounts.
- Locate the QBDataServiceUserXX account associated with your QuickBooks Desktop version.
- Select Change the Account type.
- Choose Administrator.
- Click Change Account Type.
- Select Apply to save the changes.
- Repeat the same process for each version of QuickBooks Database Server Manager installed on the computer.
For example, QBDataServiceUser30 supports QuickBooks Desktop 2020, while QBDataServiceUser29 supports QuickBooks Desktop 2019.
After assigning the required administrator rights, reopen QuickBooks Desktop and try to access the company file in multi-user mode. Move to the next method if Error 6175, 0 continues to appear.
Method 5: Update QuickBooks Desktop
An outdated QuickBooks Desktop version could contribute to unexpected errors. Installing the latest release provides recent program updates, bug fixes, and improvements that help QuickBooks run properly.
Follow these steps to install the available updates:
- Open QuickBooks Desktop.
- Select the Update Available option when it appears in the QuickBooks program.
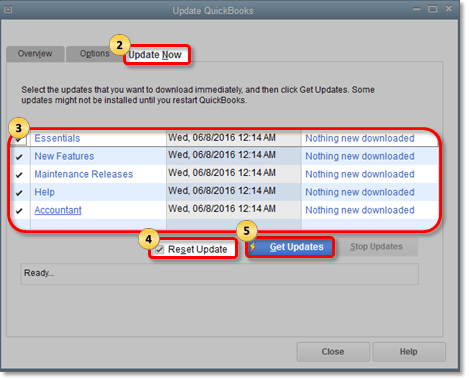
- Allow QuickBooks to install the downloaded updates.
- Wait until the update process finishes.
- Restart QuickBooks Desktop.
- Open your company file and check if QuickBooks Error 6175, 0 is resolved.
How to Prevent QuickBooks Error 6175, 0?
You can reduce the chances of encountering QuickBooks Error 6175, 0 by maintaining the QuickBooks network and hosting environment properly.
- Keep QuickBooks Desktop updated with the latest available releases.
- Make sure QuickBooks Database Server Manager runs properly on the server.
- Keep the server as the primary host for the company file.
- Check firewall rules and allow the required QuickBooks ports.
- Maintain appropriate Windows permissions for QuickBooks services.
- Store the company file in the correct network location.
- Use the correct hosting configuration for multi-user mode.
- Create regular backups of your QuickBooks company file.
Final Thought
QuickBooks Error 6175, 0 often occurs due to incorrect hosting settings, network issues, firewall restrictions, or permission problems. Check the hosting configuration, run QuickBooks File Doctor, configure the firewall, assign administrator rights, and update QuickBooks Desktop. After completing these steps, reopen QuickBooks and access the company file in multi-user mode. Contact technical support when the error continues.
Frequently Asked Questions
Why is QuickBooks unable to open my company file in multi-user mode?
QuickBooks could fail to open the company file in multi-user mode when the hosting configuration is incorrect or the Database Server Manager cannot communicate with the company file. Firewall and Windows permission restrictions could create similar access problems.
How do I restart QuickBooks Database Server Manager?
Open the Windows Start menu, search for QuickBooks Database Server Manager, and launch the utility. You can check its configuration and scan the folders containing your QuickBooks company files from the Scan Folders tab.
Does QuickBooks Tool Hub fix Error 6175, 0?
QuickBooks Tool Hub provides troubleshooting utilities such as QuickBooks File Doctor, which checks company file and network-related issues. Running File Doctor could help identify problems contributing to Error 6175, 0.
What should I do before fixing QuickBooks Error 6175?
Before fixing QuickBooks Error 6175, update QuickBooks Desktop to the latest version, check your internet connection, and back up your company file to prevent data loss.
Can QuickBooks Error 6175, 0 occur in Single-User Mode?
Yes, QuickBooks Error 6175, 0 can occur in Single-User Mode if the QuickBooks Database Server Service is inactive or the computer hosting the company file is not responding.
How does the QuickBooks File Doctor help fix Error 6175?
QuickBooks File Doctor can scan and repair company file and network-related issues that might cause Error 6175, enabling QuickBooks to access the company file correctly.
Can incorrect server settings cause QuickBooks Error 6175, 0?
Yes, incorrect hosting or server settings can cause Error 6175, 0. Ensure that hosting is enabled only on the server computer and that the server is correctly configured for multi-user access.
Why am I still getting QuickBooks Error 6175, 0 after trying all the solutions?
If Error 6175, 0 persists after trying the suggested troubleshooting steps, contact QuickBooks Support for further assistance regarding your company file, hosting, network, or firewall settings.
 +1-800-961-4963